What to Expect Before an Exterior Painting Project Starts
Exterior painting is one of the most noticeable upgrades you can make to your home, but it can also feel like one of the most overwhelming. It’s normal to wonder what actually happens before the brushes come out and the first coat goes on.
Many homeowners feel uncertain about timelines, preparation, and how the logistics will unfold. Questions about scheduling, weather, surface repairs, and what you’re expected to do can make the process seem more complicated than it needs to be.
Understanding what to expect before an exterior painting project starts can take much of that stress away. When you know how planning works and what steps happen behind the scenes, the entire experience feels more organized and predictable.
In this guide, you’ll learn what to expect before an exterior painting project starts, how professionals approach planning and preparation, and what you can do as a homeowner to feel ready without overthinking every detail.
The First Step: Setting Expectations Before Work Begins
Understanding what to expect before an exterior painting project starts helps homeowners feel more confident and less reactive as the timeline unfolds.
Many people assume the project begins on the day the crew arrives with ladders and paint cans. In reality, much of the most important work happens before that first official start date.
Before any physical work begins, you can expect:
- Clear communication about scope and surfaces being painted
- A discussion of color selections and finish preferences
- An explanation of how long the project is expected to take
- A general overview of how the crew will move through the property
This early stage sets the tone for the entire project.
It’s when expectations are clarified on both sides.
Homeowners learn what the crew needs in terms of access and preparation, and contractors confirm the details that affect scheduling, materials, and labor.
Good communication at this point prevents misunderstandings later. If something about the plan feels unclear, this is the time to ask questions.
Most exterior painting projects go smoothly when both sides understand:
- When the project is scheduled to begin
- How weather could affect timing
- What areas of the property will be accessed
- Who the main point of contact will be during the project
By setting expectations early, the process feels structured rather than uncertain.
When you know the general flow ahead of time, you’re not left guessing what comes next.
What Happens During the Initial Walkthrough and Evaluation
Before any scheduling is finalized, professionals typically complete a detailed walkthrough of your home’s exterior.
This step is more than a quick glance at the siding. It’s a careful evaluation that helps shape the entire project plan.
During the walkthrough, crews assess the overall condition of the surfaces. They are looking for signs that may affect preparation time, materials, or durability.
Common things evaluated include:
- Peeling, flaking, or blistering paint
- Cracked or damaged siding
- Soft spots in wood trim
- Caulking that has failed around windows and doors
- Signs of moisture intrusion or mildew
These details matter because exterior paint performs best on a properly prepared surface.
If areas of wood are rotting or moisture is present, those issues need to be addressed before painting begins. Skipping this step can shorten the life of the new finish. Professionals also evaluate surface types.
Different materials such as wood, fiber cement, stucco, or metal may require different primers or preparation methods. Identifying those surfaces early helps crews build a more accurate plan.
You may also notice that measurements are taken during this visit. Accurate measurements help determine how much paint and primer will be needed and allow for realistic scheduling.
The walkthrough is also your opportunity to point out specific concerns.
If there are areas that have faded faster than others or spots that collect water after rain, mentioning them helps shape the final approach.
This evaluation stage is a key part of exterior painting planning. It ensures that the project isn’t just cosmetic, but built around the actual condition of your home.
How Scheduling and Weather Planning Work
Exterior painting planning is closely tied to weather patterns. Unlike interior projects, exterior work depends on temperature, humidity, and the chance of rain, which means scheduling always includes a degree of flexibility.
Most homeowners are given a projected start window rather than a single guaranteed date. This is because paint needs specific conditions to adhere and cure properly. If temperatures drop too low, rise too high, or if rain is expected, crews may need to adjust the schedule. These decisions are not about convenience. They are about protecting the long-term performance of the finish.
Exterior painting project expectations often involve minor weather-related adjustments. A short delay due to rain or heavy humidity can prevent issues like improper curing, streaking, or adhesion failure. While a shift in timing can feel inconvenient, it is typically a sign that the team is prioritizing quality over speed.
It is also common for companies to monitor the forecast closely in the days leading up to your project. You may receive confirmation calls or messages as the start date approaches. This ongoing communication helps homeowners stay informed and prepared.
Understanding that weather plays a central role in scheduling helps reduce frustration. Exterior painting is a coordinated effort between materials, surfaces, and conditions, and aligning those elements correctly is what leads to a lasting result.
What Homeowners Should Do to Get Their Property Ready
As the start date approaches, there are a few simple steps homeowners can take to help the project run smoothly.
Preparing for exterior painting does not mean handling technical prep work. That responsibility belongs to the crew. Instead, your role is focused on access, safety, and protecting personal belongings.
Start by clearing the immediate perimeter of your home.
Move outdoor furniture, grills, potted plants, and decorative items away from the walls. Creating at least a few feet of open space allows ladders and equipment to be set up safely.
Trim back shrubs or tree branches that are touching the siding. This gives painters better access and helps ensure an even finish along edges and corners.
Inside the home, remove fragile items from walls that may experience vibration, especially if scraping or minor repairs are planned. It’s also helpful to close windows securely and notify household members about the schedule.
If you have pets, plan ahead for their safety. Gates may be left open during the day, and equipment or materials will be present in the yard. Making temporary arrangements for pets can prevent stress or accidents.
You should also think about parking. Driveways or areas close to the home may be needed for equipment or material delivery, so relocating vehicles before the first day can avoid last-minute adjustments.
These small steps make a noticeable difference. When the property is ready and accessible, the crew can focus entirely on preparation and painting, which keeps the project efficient and organized from the start.
What the Project Timeline Usually Looks Like Before Painting Begins
One of the most common misunderstandings about exterior work is assuming that painting begins immediately on day one.
In most cases, the early part of the project is dedicated entirely to preparation and coordination.
After scheduling is confirmed and materials are ordered, there may be a short period where nothing visible happens. During this time, paint is being selected, tinted, and staged. Crew assignments are finalized. Equipment and materials are organized so the project can move efficiently once it begins.
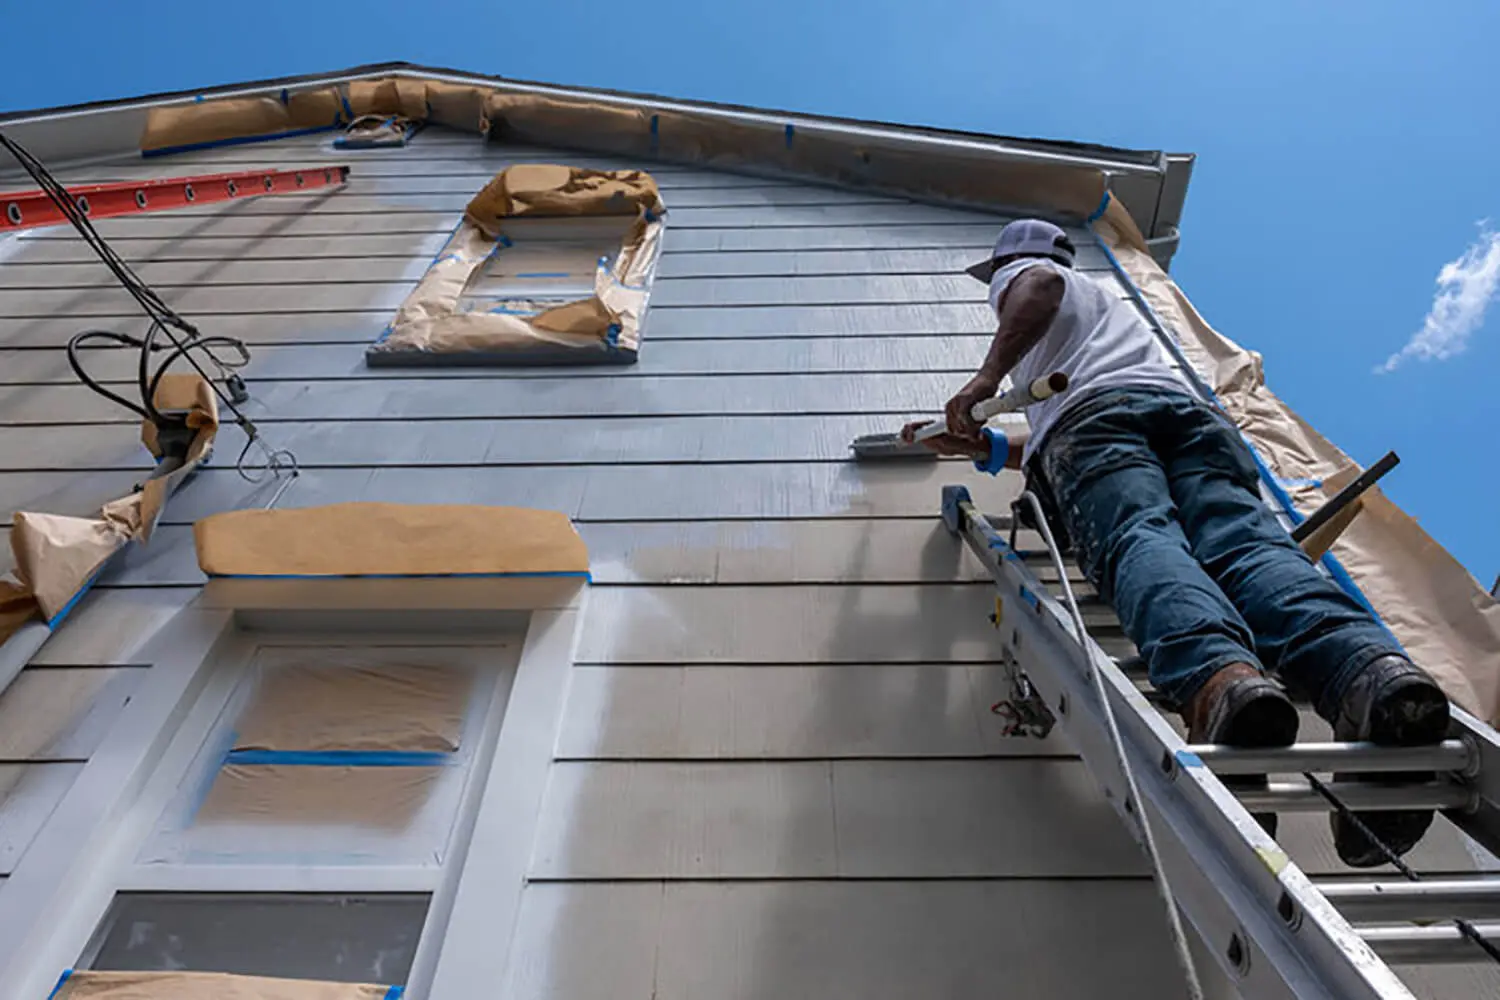
When the team arrives on site, the first day is often focused on setup and prep rather than applying paint.
This can include:
- Protecting landscaping and hard surfaces
- Setting up ladders and scaffolding
- Scraping loose paint
- Sanding rough areas
- Caulking gaps and sealing joints
If repairs are needed, those may be addressed before any primer or paint is applied.
Preparation is not a minor step, and understanding why pressure washing is part of prep helps homeowners get better results. It is the foundation of the entire project. Proper surface prep directly affects how well the new paint adheres and how long it lasts.
Depending on the size and condition of the home, this phase may take one or more days before the first coat is applied.
Understanding this flow helps set realistic expectations. The project does not start with color going on the walls. It starts with careful preparation that ensures the finish performs as intended.
Questions Homeowners Should Ask Before the Start Date
Even with a clear plan in place, it’s helpful to ask a few final questions before the official start date arrives.
This isn’t about second-guessing the process. It’s about making sure you feel informed and comfortable with how everything will unfold.
Start with timeline clarity. Ask how many days the project is expected to take and what could cause that timeline to shift. Understanding potential delays, especially weather-related ones, keeps exterior painting planning realistic and reduces surprises.
It’s also smart to confirm communication details and what to expect in a professional painting service before work begins.
Find out who your primary point of contact will be during the project and how updates will be shared. Some companies provide daily check-ins, while others update homeowners at key milestones.
Access is another important topic. Confirm what time crews will arrive each day, whether gates need to be unlocked, and if power outlets or water access will be required. Small details like these prevent last-minute disruptions.
You may also want to review finish and color details one more time. Clarifying sheen levels, trim contrasts, or accent areas before work begins ensures everyone is aligned.
If you have concerns about landscaping, pets, or specific exterior features, bring them up now. Addressing them early helps avoid misunderstandings once work is underway.
Asking thoughtful questions is part of smart exterior painting planning. It turns uncertainty into clarity and helps the entire project feel collaborative rather than overwhelming.
Wrap-Up: Feeling Ready Before Your Exterior Painting Project Starts
Exterior painting can feel like a major undertaking, especially before work begins. Much of the uncertainty comes from not knowing how the early stages unfold or what your role will be in the process.
When you understand what to expect before an exterior painting project starts, the experience feels far more manageable. Clear communication, a thorough walkthrough, thoughtful scheduling around weather, and proper preparation all happen before the first coat of paint is applied. These early steps are what set the foundation for a smooth and lasting result.
As a homeowner, your responsibility is simple. Make space around the home, plan for pets and access, and ask questions if something feels unclear. The rest is handled through organized exterior painting planning and careful coordination behind the scenes.
If you’re considering updating your home’s exterior and want guidance through every step, Seaside Coatings is here to help. We walk you through the process, explain what to expect, and ensure your project is scheduled and prepared with care. Contact us to discuss your exterior painting project and move forward with confidence.