How to Fix Water-Damaged Walls Before Repainting
You notice discoloration, bubbling paint, or a soft patch on the wall. The instinct? Repaint it quickly and move on. But painting over water damage without addressing what’s beneath the surface will cost more in the long run—both in appearance and in actual damage.
Knowing how to fix water damaged walls before painting is about more than getting a smooth finish. It’s about protecting your home from mold, structural deterioration, and repeated paint failure. And while it may seem like a surface-level problem, the solution almost always calls for a trained professional.
Let’s look at why proper remediation matters and why pros are equipped to do it right.
What Professionals Check Before Wall Repair Begins
Fixing water-damaged walls isn’t just about patching up drywall—it starts with understanding the full extent of the damage. Experienced painters and remediation specialists don’t skip ahead to cosmetic fixes. They begin by assessing the source, severity, and stability of the damage before anything else.
Here’s what pros evaluate before any surface prep begins:
Moisture Detection and Leak Source Assessment
Professionals use commercial-grade moisture meters and infrared cameras to determine whether there’s still active moisture behind the wall. Even if the surface appears dry, hidden dampness can continue damaging materials or encourage mold growth.
- Common sources include: roof leaks, pipe bursts, HVAC condensation, or window and door seepage.
- Addressing these issues first is critical—otherwise, any paint job will fail within weeks.
Structural and Material Damage Review
Trained experts assess whether the drywall, studs, or insulation are still intact. If water has been present for an extended period, the underlying structure may be compromised.
- Sagging, soft spots, or crumbling drywall indicate the need for material replacement.
- Wet insulation or warped studs require attention before painting can even be considered.
Mold and Air Quality Concerns
Mold often starts behind the walls and doesn’t show up until it’s well-established. Pros are trained to spot early signs and take samples if needed.
- If mold is present, licensed remediation is required before any paint can be applied.
- Professionals follow proper containment and disposal protocols to prevent spreading spores.
This step is where expertise matters most. Surface-level solutions can mask the issue—but they won’t solve it. By starting with a full diagnostic process, professionals ensure the problem is resolved from the inside out.
The Professional Process for Fixing Water-Damaged Walls
Once the source of the damage is identified and the wall is fully inspected, professionals follow a structured restoration process. This approach is far more advanced than a simple patch-and-paint fix. It ensures that every layer—from the studs to the final coat—is sound, safe, and ready to perform.
Here’s what that process typically includes:
Drying and Containment
The first step is moisture control. Professional crews use industrial-grade drying equipment—including air movers, dehumidifiers, and containment barriers—to draw out deep-seated moisture. This phase is crucial, even if the wall feels dry to the touch.
- Moisture levels are monitored with digital meters to ensure complete drying.
- Plastic sheeting or containment zones are used to isolate the work area and protect surrounding rooms.
Material Removal and Surface Prep
Once the area is dry, the real work begins. Professionals strip away damaged materials and prepare the surface for restoration—not just cover up the problem.
- Loose or flaking paint is scraped away.
- Warped or mold-compromised drywall is cut out and replaced.
- Any nails, screws, or fasteners affected by corrosion are removed and reinstalled.
This ensures the surface underneath your new paint is solid and stable
Mold Remediation and Primer Sealing
If mold was present, pros use EPA-registered antimicrobial solutions to treat the exposed surfaces. Once cleaned, a high-performance stain-blocking primer is applied to prevent discoloration and future mold growth.
- These primers also help seal residual stains and odors.
- Specialized coatings help prevent moisture reabsorption in problem-prone areas.
Blending and Finishing Touches
After the repair, professionals blend the patched surface into the surrounding wall. This requires precise sanding, texturing (if needed), and color matching to achieve a seamless look.
- Seam lines are feathered to avoid visible transitions.
- The entire wall—or sometimes the full room—is repainted for consistency.
This process restores both the function and appearance of your wall—giving you a smooth, clean surface that will hold paint properly and resist future damage.
Why DIY Water Damage Fixes Rarely Hold Up
Water damage often seems like something you can patch and paint over with a weekend and a trip to the hardware store. But even the most determined DIYer typically misses the hidden problems that professionals are trained to uncover—and resolve. The result? A temporary fix that doesn’t last, and often costs more to repair later.
- Professionals use calibrated tools to detect hidden moisture and verify safe drying levels.
- In many cases, amateur fixes have to be undone before the real repair can begin—doubling the cost.
- Licensed remediation ensures health and safety standards are met.
- Skilled painters blend repairs into the surrounding wall, making the fix invisible.
Hiring professionals may seem like a bigger commitment upfront, but it ensures your wall is properly restored—and your investment protected.
How to Spot Early Signs of Water Damage Before It Spreads
In many homes, water damage goes unnoticed until it’s severe—but subtle visual and textural cues often appear much earlier. Recognizing these early warnings allows for faster intervention and can prevent the need for more invasive repairs down the line.
Here are signs that signal a potential moisture issue behind your walls:
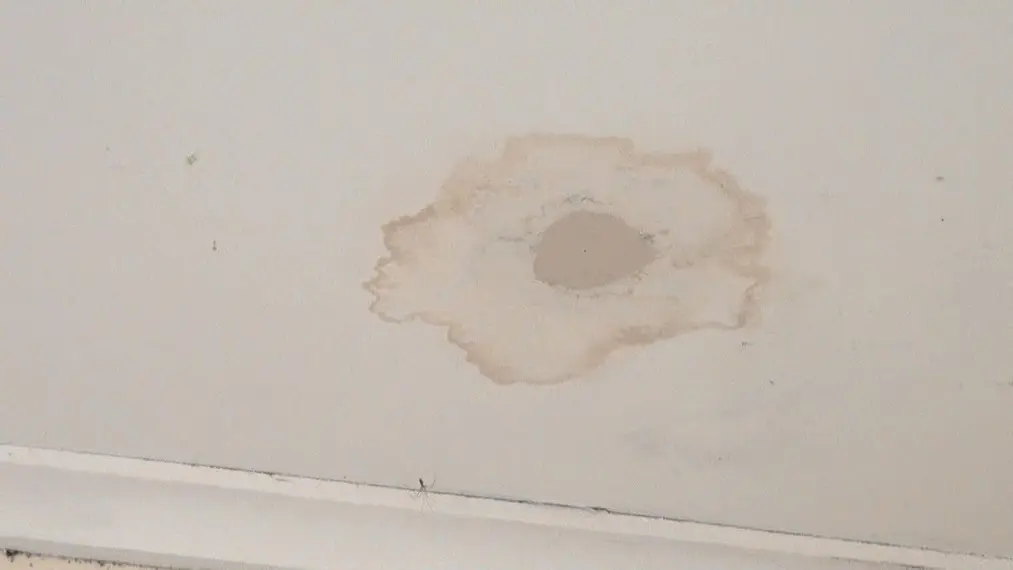
- Discoloration or staining: Yellow, brown, or gray patches on drywall usually indicate water intrusion from behind the surface.
- Bubbling or peeling paint: When water pushes through from behind the paint layer, it causes air pockets or flaking.
- Musty or damp odors: A persistent smell, especially in closed spaces like closets or behind furniture, can signal mold or trapped moisture.
- Soft or spongy spots: When you press gently on the wall and it gives, that typically means the drywall or insulation has absorbed water.
- Visible mold: Any black, green, or fuzzy spots should be addressed immediately. Surface cleaning is not enough to eliminate root mold growth.
Catching these issues early reduces the scope and cost of the repair. That’s why many homeowners schedule annual inspections in moisture-prone areas—especially in climates with high humidity or frequent storms.
If you spot one or more of these symptoms, it’s best to have a professional assess the area before repainting or renovating.
Protect Your Home by Fixing Water Damage the Right Way
Water damage isn’t just unsightly—it’s a signal that your walls have been compromised. Painting over it without addressing the root issue can lead to bigger problems: mold growth, recurring damage, and costly rework.
To truly restore a water-damaged wall, you need more than patchwork. Professionals assess hidden moisture, repair structural damage, use mold-safe primers, and apply durable finishes designed to last.
In short: knowing how to fix water damaged walls before painting is only part of the equation—getting it done right is what protects your home in the long term.
Not sure if your wall is ready for paint? Schedule a professional wall evaluation to restore it safely, completely, and with lasting results.